A barricade cover only does its job if it fits the barricade. The artwork can be flawless and the vinyl can be bombproof, but if the panel is two inches short at the ends or the hem flaps loose in the wind, the cover looks cheap and reads as an afterthought on camera. Fit is a specification problem, and it is entirely solvable before you place the order. This walkthrough covers the five decisions that determine whether your covers hang tight and photograph clean: measuring, fit style, attachment, artwork placement, and the quantity and timeline math.
Start by measuring your actual barricades
Do not order to a category name. Crowd-control barricades come in several lengths that look identical in a listing, and a cover cut for the wrong one will not sit right. Steel interlocking and bike-rack barricades commonly run 6.5, 7.5, 8, or 8.5 feet long, while the height clusters in a narrow band around 40 to 43 inches. That means the length is where mistakes happen. Measure a representative panel end to end across the top rail, then measure the height from the top rail to where you want the cover to stop, and note whether you want the cover to hang to the feet or stop above them.
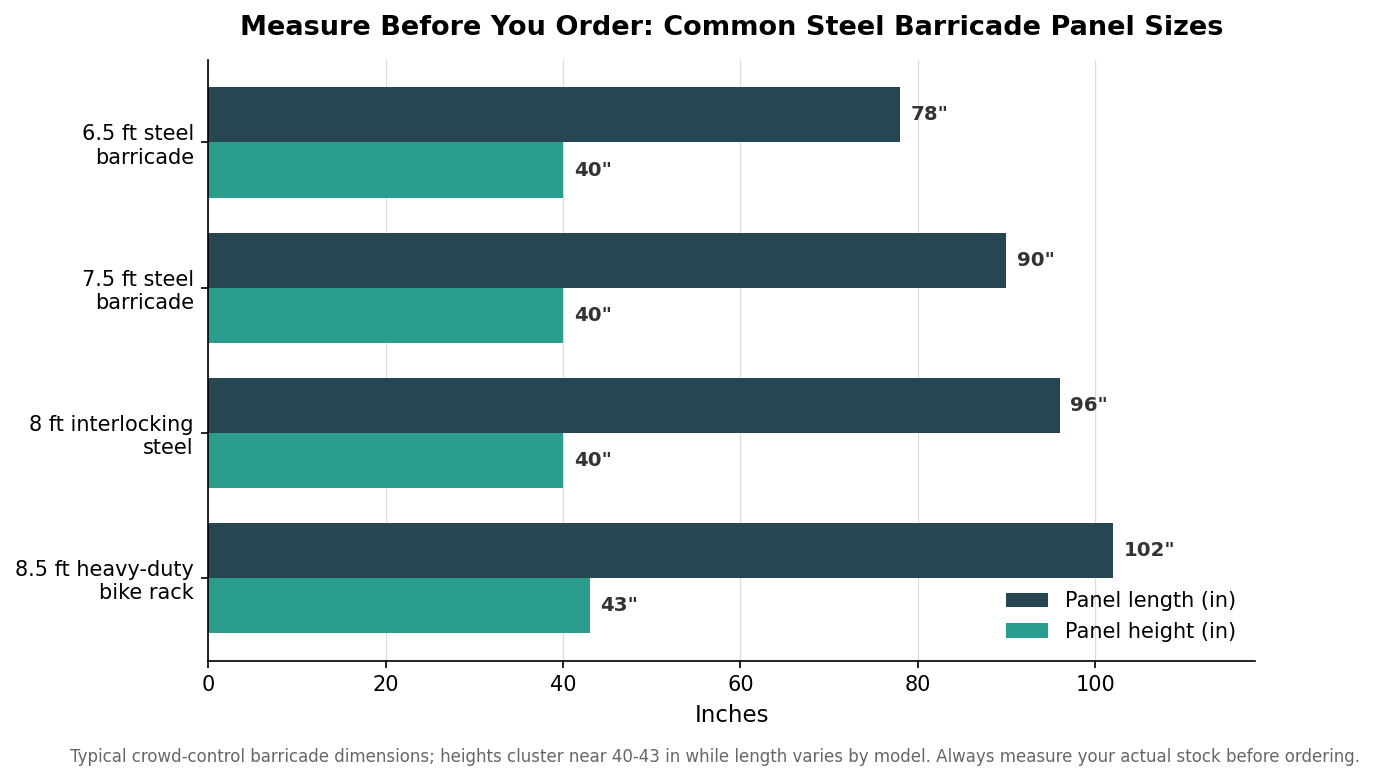
If your inventory is a mix, measure each type and expect to order more than one size, because a single cover cannot fit both a 78-inch and a 102-inch panel without bagging on the shorter one. Also record the rail diameter and whether the barricade has a flat top or a looped bike-rack top, since that affects how a hem or pole pocket slips over it. When you send specs to a printer, give them the measured numbers rather than the manufacturer’s nominal size; galvanizing, welds, and model year all shift real dimensions by an inch or more.
Pick the fit style that matches your look and budget
There are three broad fit styles. A throw-over cover drapes over the whole barricade and secures underneath, which is fast to deploy and forgiving of small size differences but can wrinkle and move. A fitted jacket is sewn to the panel dimensions with a closure along the bottom or back, giving the tight, flat face that looks best in photos and on broadcast. A stretch fabric cover uses a spandex-type material with an elastic hem that pulls taut with no hardware, which looks clean and packs small but is less rugged than vinyl for long multi-day outdoor use. Match the style to the setting: a fitted vinyl jacket for a branded finish line that has to look sharp on camera, a stretch cover for an indoor expo, a throw-over for quick perimeter work where speed matters more than a perfect face.
Choose the attachment that survives your event
Attachment is where covers fail in the field, usually because someone specified the minimum. The common systems are hook-and-loop closures, grommets along the lower edge with zip ties or bungees, ball bungees, and elastic hems on stretch covers. For an indoor or low-wind setting, an elastic hem or a few hook-and-loop tabs are plenty. For anything outdoors, plan on grommets with zip ties or bungees at close spacing so the bottom edge cannot lift, and add ties at the ends where wind gets under the panel. Wind is the enemy of a solid vinyl face, because the cover acts like a sail; an open-weave mesh cover sheds much of that load and is worth choosing for exposed, breezy sites even though it prints slightly less vividly than solid scrim. Whatever you pick, over-specify the attachment rather than under-specify it, since re-securing covers mid-event is the most common day-of headache.
Place the artwork where it actually reads
Barricade covers are usually printed on 13-ounce scrim vinyl for lighter or shorter-term use or 18-ounce for heavy, repeated deployments, and you will choose between a standard logo zone, often around 24 inches high by 60 inches wide, and a full-panel wrap. The design mistake is centering everything and losing it behind a leaning spectator or a stack of gear. Keep the primary logo and any critical wording in the upper band of the panel, above roughly the 20-inch line, so it clears heads and equipment. Decide early whether you need double-sided printing: the crowd side and the outside of a barricade often face different audiences, and a single-sided cover leaves one of them blank. Double-sided costs more but is usually the right call for anything that separates two viewing areas, such as a stage front or a course.
Do the quantity and lead-time math
Covers are ordered per panel, so estimating quantity is simple arithmetic once you know your linear footage: divide the run by the panel length and round up. A 50-foot stage front in 8-foot panels needs about seven covers, a 100-foot finish chute about thirteen, and a 200-foot VIP perimeter about twenty-five. The chart below shows the staircase for 8-foot panels.
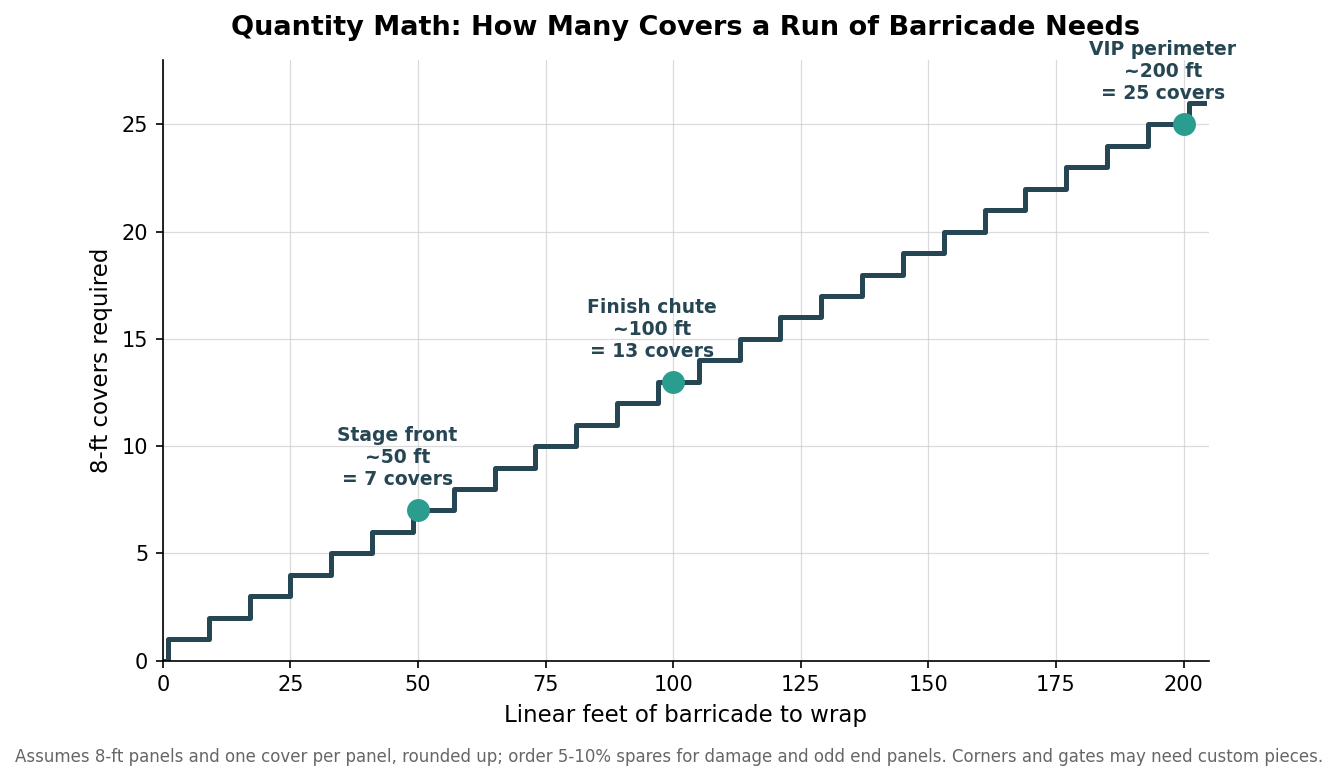
Order five to ten percent spares beyond the bare count. Panels get damaged, end sections come up short, and corners and gates often need odd pieces that do not fit a standard cover. On timing, custom printed vinyl covers commonly run about 7 to 10 business days in production after artwork approval, stretch fabric a little longer at 10 to 14, with rush options around 3 to 5 days for added cost, and entry pricing for a single custom cover often starts near $150 before volume brings the per-piece price down. Treat those figures as indicative, since they move with supplier, material, and season, and build in time for a proof and a physical sample. The discipline that prevents almost every fit problem is the same one that opened this guide: measure your real barricades, spec to those numbers, approve a sample on an actual panel, and only then commit to the full run.